Labels

aprons (4) baby (6) bags (2) bibs (3) Birthdays (4) blankets (3) blogswap (1) cakes (7) Christmas (4) cleaning (1) clothing (38) decorating (14) Easter (1) Etsy (4) favorite blogs (2) for sale (21) funny (2) furniture (3) gifts (8) giveaways (6) guestposts (1) jewelry (15) kids (9) organizing (7) Other Holidays (1) pre-school (2) recipe (9) scrapbook/cards (3) sewing (34) signs (4) thrifty finds (11) tutorial (12) vinyl (3) watch bands (2)
Showing posts with label decorating. Show all posts

Monday, January 30, 2012

Hallway Command Center

Everytime I think I have this place organized there is something else I find to do.

I have spent about 6 months trying to figure out how I wanted to do this. I needed a place to keep those rascally papers that need to be kept handy, team schedules, permission slips, birthday invites etc. I also wanted a chore chart that was dry erase and IN THEIR WAY, they walk past these 10 times a day, at least! So here is what I finally came up with.


In this last picture you can even see MY BIG CALENDAR, I sold several of these vinyl calendars on windows and wanted mine to have a lot more space for notes to the kids, grocery lists and honey do lists, etc. I love this calendar and can't believe I ever managed to live without it. We write EVERYTHING here. It has helped me IMMENSELY.
I am working on some picture magnets for my 3 year old to go on this magnet board.  I hope he will catch the spirit of the whole chore thing.??
Thanks for stopping by my blog.
So tell me, do you have one place for everything?  Do you have a neat way to keep it all together?

Monday, November 14, 2011

Entry - Reveal

Yard sale score, no lie I was on my way to HObby Lobby to buy these. I got them for 10 bucks each instead of 70 ish.  It felt like Christmas.!!
Here is the before shot, I can't believe I left it like this for so long. --Really Becky??  nothing even matches.  Okay honestly I was waiting until I decided on a paint color, now that was hard because it needed to be the same as the hallway and the living room, so here it is. a beige color. pfff,  gave up on something exotic and just went with the easy to please color.   My wood floors and wood trip made it hard for me to choose.
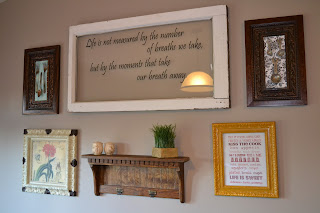
YAY my gallery wall is complete, really I had a heart attack putting all those holes in the wall, you have to be sure where to put things.
#1 - First arrange them on the floor, then cut paper to the size of each frame and them arrange those on the wall, you will be glad you went to the extra work for sure!!
I took these pictures at Halloween obviously, I can't wait to get them ready for Thanksgiving. I will be home from TN in a couple of days... should I skip it and just get Christmas out. I really might. hahaha

Tuesday, October 18, 2011

Tuesday Tips - Easy Distressing for small projects.


First of all click here for my current giveaway,
closing Wed. Oct. 26th 
Candle sticks are so popular, I think they aways will be.  I have spent quite a few bucks on them, butt to tell you the truth my favorite ones are these thrift store candlesticks. 


There are so many ways to distress something, or antique it.  Here is a simple way that you can't really mess up, for something that might be small.
This one WAS wood, so I sanded it, really sloppily with a VERY course grit sand paper.  then covered it with white paint.  I didn't water it down,  It just depends on how much you want to wipe off. 
I wanted a lot of paint this time.  I waited longer tooI waited 5 minutes then gently wiped off with a wet  paper towel.  every where I had sanded it was White.  Love it.


I followed the same process with this one only I used a very fine grit sand paper and only sanded where I wanted white to stick.

I forgot to take before pictures.  This red one was too bright.  It is not made of wood, so I didn't want to sand it.  I watered down some black paint.  maybe a quarter size dollop of paint and 6 or 7 drops of water.  Use a sponge brush to cover it.  
* The darker you want it to look, the longer you wait.    I waited about 2 minutes. then used a wet paper to wipe the paint off.  DON'T SCRUB, just wipe until it looks good.
This one followed the same process as the red candlestick, only at first I put the black where I wanted more,  then I rubbed the whole thing with my wet paint rag.


If its too thick in one spot you can get a clean wet rag and keep wiping.
Finished.  It is so Tall and pretty,  and I found it at the thrift store for 5 bucks, SCORE.
Here are the 3 smaller ones I put on my redecorated entry.  I will be featuring the entry next week. 
I LOVE IT.

Thanks for stopping by, and Please leave a comment, they make my day
Have a lovely week ~ Becky

Monday, October 17, 2011

Monday at My House - so so so so happy

Saturday is the only day I get to have my hubby here, most of the time he travels or works INSANE hours. He is my SUPER HERO. He doesn't love to do my annoying decorating projects. But this Saturday he spent the WHOLE day doing "honey do's" for me. Did you hear me......THE WHOLE DAY!!!  He even made a couple of dreams come true for me. (I am cheesy) Maybe it makes a difference that I have been asking for a tile back splash for about 4 years. AND when I say asking...I do mean nagging and begging. We have had some of these supplies for a very long time.
Cutie Pie! wanted to help, well for a minute. As soon as I snatched a picture he was off to play. "That's boring mom."
So there it  is before. We, well.. I,  had planned this in our last house, lucky we never got it done, so we had some of the stuff all ready when we moved here.
Check out this Tile setting Mat.  It saved us a DAY.  Normally you apply the mastic, then the tile, and wait 24 hours before grouting, and it is MESSY, Messy, MESSY!
This stuff was so cool, I HIGHLY RECOMMEND IT.  We really needed to do this in one day. It is 18"x 9" and comes with  12 sheets. for about 15$.  SO WORTH EVERY PENNY.
It went pretty smooth, and we didn't have to do much cutting,


See the beautiful kitchen??  Even my kids said, mom it looks like a different house!!  It took us about 4 hours start to finish. for a 12 foot wall of back splash.

Friday, October 14, 2011

Fabulous Fall Friday - Wreath

If you are following the Follow Me Friday Blog Hop.... from Trendy treehouse  Cleck here to learn more about Me!

So I was going to make this my Thrifty Thursday, but I had to go to "town"and ended up gone from 9-5, ever have one of those days, whew, I was sooo tired. the only thing I had to actually BUY for this was the leaves, and they were $1 at JoAnns. Everything else I had on hand.
even the corn husks.  I froze a lot of corn this year, so there was a mountain of this stuff in my garden.  The wreath was .50 at the thrift store, I think I bought it last Christmas time. I tore the husks into smaller strips, and I used hot glue, for almost everything.
Paint stamps and tiny square of burlap were just in my stash, and the little $1  frame I bought for another project, I guess I will still have to get one for that when I am ready I guess.
Use a sponge brush to lightly brush on the paint, and practice on paper.  A stencil would work great too.
Break the back off the frame, and wrap wire around it to attach it to the wreath.  I think it would be cute to write Fall if my frame was a little bigger.
Finished.  I really love it, but.....  my front door is still white so it doesn't look very good.  I guess I better paint the door.

Monday, October 10, 2011

Monday at My House - Kitchen Wall

 There it is.  New coat of paint, some new artwork,  well new is not the right word  all of them old looking..... Does it look like I went to the Thrift Store and picked up a bunch of stuff?     Wait, don't tell me, I like it, I think its prettier in person. 
now I am thinking too much.  One of the pieces has some antique silverware and the other in the matching frame has my husbands grandmothers measuring spoons,  which we picked out when she passed away several years ago. 

I also love having the salt and pepperon that little shelf right next to the table.  Do you always realize you forgot it after everyone is sitting down?   WELL I DO. 
Click here to find out more about the silver ware art, or here to see where I got the printables.
Okay One wall down, and .................... well all the rest to go.  Love having painted walls after waiting a year!

Friday, October 7, 2011

Fabulous Friday - Kitchen Art

Here is another piece I put together for my "freshly" painted kitchen wall.   Monday I will show you the whole wall after its all put together.
 
I started with a cute piece of framed art from Family Dollar. It was on sale for 3.50 and is about 10x14.


Next I took the whole thing apart, use a flat screw driver to pry those wierd "cheap" staples out, Carefully. You won't need the glass for this project  


all it took was some E-600, (already had) some old old silver ware I rescued from my mother-in laws trash (free) and a piece of scrapbook paper I already had.  (.50)

I really like it, and I have had that silverware laying around for about 6 years now.....  I used some as hooks on a sign I gave to my sister which turned out very cute, but now I have some in my own kitchen. YAY.  I am so relieved to finally get the wall put back together!!! Well there you go, Easily done for under 10 bucks, and I finished the whole thing during one episode of The Office,

Thursday, September 22, 2011

Thrifty Thursday- rug and earrings

Here are some dollar store earrings. I really don't nee more silver earrings, and I almost never wear gold. However, I sure could use some black or brown earrings.  So I whipped out the trusty Krylon Spray paint.

I can't wait to wear them, I am a kind of obsessed with earrings. 


Here is the rug from Monday's post,  It is made with 6 dollar store jute rugs.  I tied them together with a ball of Jute.  I love it,  To go buy a rug this size would be about 40 or 50 bucks.  I hope my 6 dollar rug will last a while, for 6 bucks its worth a shot!

Monday, September 19, 2011

Mondays at My House - The Front Porch.

Seriously with a view like this..... I wanted to be able to sit on my front porch to sit and enjoy it.

.

I was SO excited when we bought this house a year ago, I loved our last two houses, but, I have always wished for a front porch. NOW I have one. I love it.  Well... that rug has to go, and I couldn't wait to decorate it.


I added some flower pots from Costco, These were only 39.99. Honestly, I think in this case it was cheaper to buy them all planted. I weighed the options and just bought them, next year I will just reuse the planters.
Isn't my plant hanger awesome!! My father in law made that for me one Christmas, he loves to weld cool things, so when he made one for my MIL, I said I would love one for Christmas. Then Jeff ran hoses through it so it would water automatically, because.... I kill plants.
I've been yard saling all spring for some awesome wicker chairs, but sadly, no luck.  I wanted something that was inexpensive so that when I come across the perfect wicker furniture (for cheap) I can go for it.  I added this wooden trunk, from a yard sale.


My biggest goal on the front porch was COLOR, I think I managed to achieve that.

Does she look annoyed or what? I think she wanted my attention. 

Wednesday, September 14, 2011

Bird Hurricane Jar

I just love this new addition to the entry.  cost. $2.00
I found the glass at the thrift store and looked for tin that had  a lid that could fit on top, then I bought a little birdie knick knack to glue to the lid, the rest of the items I had around the house.  ♥

I know, my entry is boring,
Related Posts Plugin for WordPress, Blogger...