Labels

aprons (4) baby (6) bags (2) bibs (3) Birthdays (4) blankets (3) blogswap (1) cakes (7) Christmas (4) cleaning (1) clothing (38) decorating (14) Easter (1) Etsy (4) favorite blogs (2) for sale (21) funny (2) furniture (3) gifts (8) giveaways (6) guestposts (1) jewelry (15) kids (9) organizing (7) Other Holidays (1) pre-school (2) recipe (9) scrapbook/cards (3) sewing (34) signs (4) thrifty finds (11) tutorial (12) vinyl (3) watch bands (2)
Showing posts with label sewing. Show all posts

Wednesday, February 1, 2012

Easy Peasy Boot socks.

Could this be any easier?    #1 cut the sleeves off a sweater, (a larger one)
                                           #2 hem it using some elastic and stretching it as you sew.

~voila, you can be done or you can add more to it if you want.  I had plenty of lace and some little yellow flower appliques, I just love them,  The set I plan to dye gray.

Tuesday, November 8, 2011

Another ruffled T


I can't believe I thought I would be able to blog while in TN,  I am exhausted and busy busy busy watching 6 kids for my bro and sis in law while they are in Africa while my Mother In Law watches my little darlins.  I really don't have time unless they are sitting here eating their lunch or in bed.  ---whew---   I am just posting some photos I had saved and not posted yet when I have the time.

Saturday, June 11, 2011

Katie's skirt

Its been a while and I just now realized I never posted this.   Here is Katies skirt for her little brothers wedding.  the colors were yellow and orange. 
It was so fun to make,  thanks to Emily and Katie for letting me help them with it, and for all the fabric (should be enough to make myself one)

Monday, April 25, 2011

cute and custom PURSE

I really learned a lot of helpful things on this purse, so I think I will make a tutorial for this. Anyone can make a bag, but with a few tips it can really be a VERY nice purse.


Stay tuned for some Really great TIPS!!!! If my machine is fixed that is.....(cross your fingers)

Tuesday, April 19, 2011

Stashbusting Hoodie Tutorial

Well You might be able to tell by the picture below but I kind of have a problem with getting rid of things. I LOVE PRETTY FABRICS. Its an illness I've inherited from my mother, who got it from her mother, and well.... I love it. It took me years to figure out what, if any, qualities could I have possible inherited from my mom. She is good at everything, and I finally put my finger on it. Neither one of us can get rid of stuff. I really don't think its a bad thing. Well... not if you can use that stuff for good. So this past month I have vowed to make things out of my "STASH". Today over at T-Shirt Diaries    Robin was sweet enough to feature me.  Today I want to show you one thing I made out of a few things I found in this pile of junk.
This sweatshirt was by far my favorite thing that came out of this stash.   However the cutest thing I ever made is the little squirt wearing it. 
Its overwhelming when you have such a large stash to pick from, so start by sorting you stuff.  I have different shelves for each category (after this shirt I had to take a couple days off of sewing to reorganize the storage room, it was getting crazy in there, so you can't tell I have it organized in this photo)
Sweatshirt fabrics, Knits, Flannels, cottons, fleece, Clothes to recycle (I only save the clothes that are in either really good condition, or prints and colors that I love), Fancy stuff, Small Scraps, and Misc.  The little drawers you see, are filled with, Thread, Elastic, Lace, Ric Rac, and Bindings.  A lot of these things I find at thrift stores or on clearance, I stock up when I see something I will need  I will need in the future.  I recently took several bags full to goodwill, DO NOT... I repeat... Especially if you are married, and want to keep your hubby happy, DO NOT KEEP EVERYTHING.   I know its hard for me too.
So here is the up cycled Hoodie.  I used three different shirts for this project plus a small scrap of flannel to line the hood.  The shirt on the far right had a faded picture on it, that is what I used for the front, the polo on the left was used for the sleeves and I used the buttons for the front of the sweatshirt too.
So back up - lets talk about a pattern, I used a regular shirt pattern that I got from taking apart one of his messy stained t-shirts.  I like to trace them on the comics, or if I want to keep it forever, a plastic disposable party table cloth, they are PERFECT, and don't rip. I used this other sweatshirt to get the hood shape.
First cut out the front and back, and sleeves, then cut the button piece off of the polo, sew it onto the little sweatshirt, fold it over the top and sew it across the top too.  Then open it up and clip the shirt behind it, making plenty of room for big toddler heads.
Measure the neck opening with a measuring tape, then make sure your hood is the same size

Once you cut out the hood, lay it over the fabric you want for lining, and cut that out, I left a big green border on the inside but you don't have to.
Then sew that around the neck.    **I sewed the side seams last so there wouldn't be a lot of bulk in the way while I did this next part.

For the pockets, I looked at another sweatshirt and drew this onto newspaper first, Cut it out and laid it on the sweatshirt to see if I liked the size and shape.    The fabric I was using was so stretchy that i made a flannel lining for the pockets, that part is optional.


I just love it,  and it makes him so happy that he saw me making it for him.  Now the other boys want their own..... hmmmm.

If you have any questions or I missed something please ask!!!
If you use this tutorial, or any of my tutorials, please let me know, I would LOVE to see your work.

Becky

Wednesday, March 30, 2011

Owl Pillow

I have been working on McKinley's room ever since we moved in in September.  I just made her some pillows and here is the owl one.  Basically made from scraps from her other pillows.  I will only post this one for now since it fits in with the STASH BUSTING challenge!   It just takes tiny pieces, and a long strip of minky for the sides.  I didn't follow a tutorial for this one, but I think there are probably several out there.

Tuesday, March 22, 2011

Sweater Refashion

I LOVE black and white.  I have seen this wide lace used in a LOT of clothing lately.  So I found a cute white sweater that I could alter.  Cut it up the center then added this black lace to both sides.  I love it so much,  I still haven't worn it though.  I think it needs somekind of a button or something to keep it from flapping open, like it seems to do.  I am not self-confident enough to take a picture with it on me.  but maybe someday. hmmmm.   What do you think?  A button?  at the top, or the middle?  or a ribbon to tie a bow to hold it somewhat closed? remember a belt will not do, I am no skinny, flat chested chic.

Thursday, March 17, 2011

Some of my favorite projects

I follow the blog " I am Momma, Hear Me Roar"  very closely.  In fact she is so creative and cute and thoughtful, and spiritual I try to do everything just like her.... (kidding.... well, exagerating anyway, lol)  This is her Ed Hardy inspired shirt  Westin sees me sewing so much that he was so happy to have something that was just for him.  Really, I know it doesn't look like it, but he was.  You see he has middle child syndromw pretty bad, so I have been trying to make sure I pay him special attention often.  It does amazing things for his attitude.   I think I will try this again and I am sure it will turn out much better.

This is another Project I saw over at Cheri's blog (I am Momma...)   The Big Shelf  I absolutely LOVE it,  It took me forever to get my husband to put it up.  THey have much cuter Corbels (the big white brackets) at Hobby Lobby.   I don't live near one so I got these at Home Depot and was finished by the time I was in Boise at Hobby Lobby.  Love that place.    I must say the birdcage is from the dollar store a long time ago, the Huge Canvas print on the left was $10 at family Dollar, and the Vase on the Right was $7 at Family Dollar.  My room finally feels cozy.

Tuesday, March 8, 2011

Cutest LIttle Boy Pants EVER!

These could be some pretty cute Capri's on the right person, but they just look dumb on me,  No big loss I am pretty sure they were around 10 bucks a few years back. 

Last week I was browsing around all the posts for "Celebrating The Boy" (which is crasy awesome) and came upon this Tutorial at "This mama makes stuff.
I am still breathless, and I must tell you that once I cut these out they took me about 15 minutes to sew together.  The pockets from the back of the pants look like they were meant to be.
and just look at my little man
I am not quite the photographer that she is but Dang they are CUTE!  I wanted a pocket on the front and used this tutorial by Dana Made it.  She is also a genius.
I really must say something about my hubby's mad craft skills,  This little guy turned 3 a couple of weeks ago, and I convivced his daddy to build a platform with a slide on it to go with our swing set.  Now it just needs stained.

Lisa's Shirt. ~ Stashbusting challenge

This is a very simple shirt I made by laying a shirt I had out on fabric and cutting around it.


I then appliqued some black leaves in a few places.  I LOVE IT.  however I didn't consider the stretchyness of the fabric.  This fabric is knit but a wierd non stretchy type.  I tried to squeeze into it and immediately thoght.  Hmmm. I guess this one is for my SIL Lisa.  She would love it, and is at least a size maybe two smaller than me.  I am pretty sure it was meant to be, since it was even her birthday!!  I hope you like it Lisa.


It is Spring Stashbusting time!!
I took the challenge, and will even have my own feature sometime in the next month Right HERE on the T-Shirt Diaries. 
The challenge is NO TRIPS TO THE CRAFT STORE. 
this should be a piece of Cake for me, I like how Robin from the t-shirt diaries described it.  "You know when you feel like you are one shopping trip away from being featured on HOARDERS"
~ Its like she knows me personally or something ~
If  you feel like you want to join the challenge, you can link your blog up to the challenge on the link above.  Happy Stashbusting everyone!

Monday, March 7, 2011

A new top for me.

I bought a plain tank top at Old Navy for about 8$.  then added some lace appliques bought for $1.  I addes lots of pearls and sequince that I already had.  Then I wore it with a white long sleeve shirt and a black cardigan. YAY.  I love new clothes,  it gets me all excited to go and do something fun.

Thursday, June 10, 2010

another J crew inspired shirt.


Here My blog post from blog swap with Night owl Crafting.
My mother and all my grandmothers were seamstresses, and baking pro's. My mother actually made Wedding dresses and had a successful business when I was younger. That is of course where I learned to sew. She even tells me stories about how my grandmother would ride into town with my grandpa and sit in the car in front of the clothing stores and sketch the cute newest fashions, then she would go home and make things out of the hand me downs they were given. I think that is so cool, that she was refashioning back in the 1940's too. They had a small farm and 5 girls and 1 boy. So money was super tight. Right now I am OBSESSED with jewelry and have an etsy shop here above and below is a sampling of the projects I have made recently.
I love to copy ideas from jcrew (below)or anthropologie.


Here is my latest attempt.I started with my husbands pink shirt which I figured he was never going to wear.
I took in the sides, and used the scraps from that and the sleeves to make a ruffle to line the neck area. I also had to make a facing for the neck and arm holes, to hem them. I did this by laying the shirt on the scrap fabric and tracing the curve. easy peasy.


I totally love it. I think it is my new favorite article of clothing, I wore it yesterday and got lots of compliments.
I hope you enjoyed it, Thanks Leslie for letting me blog swap with you and your cute blog! I hope you will all take a look and let me know what you like. Today is the kick- off of my "Crafty Summer" I will be posting something every weekday in June. I hope you will join me.
Becky

Wednesday, June 9, 2010

what I've been up to.

I am sorry for the lack of posting, lately I have been so obsessed with finishing unfinished projects that I haven't finished any posts. hahaha. I am going to apologize to you right now. I realize I am probably only talking to myself? Is there anyone out there reading this blog? I guess the reason I started blogging was to feel more organized, so I have a record and pictures of the things I've done. I frequently get asked how to do things, and if I give them the blog address then they know right where to go. I follow more blogs than I can even count... really. So most things I make or have made are allready out there. I like to post my attempts with links to other blogs so my friends can find out how to do it. If my blog has helped or inspired you in anyway. Let me know, I would love to do a post about you, your project, blog etc. I am going to be more on top of things this summer unless if by some miracle we sell our house, :S


Here are a couple of pictures that I meant to blog about and never did.

We (Activity Days) made some of these snakes out of minky and fleece for Humanitarian aid (I made a few more for birthday presents) for humanitarian aid we used fiberfill and for heavier ones, for presents, I used wheat. Because thats what I have a lot of. So far everyone loved them. But then again. I really don't think they would tell me, ummm Becky these are dumb.

I bought this towel and Kohls. I wanted to make one, but I gave in and bought it because I had a coupon. But it would be pretty simple. On the corners it looks like paws. so cute!

Mckinley's spring scarf i made with fabric off the remnant rack. probably cost .50 It is about or 8 inches wide, then sewn into a ring. after that I soaked it in water and wadded it up and sat it in the sun to dry. Here is a good tutorial at ruffles & stuff.
So now I will begin to
Celebrate a "Crafty Summer"
with a new post every weekday in June.
You heard me right.
stuff to make for you, your kids, with your kids, for a neighbor, or to EAT!
I will start tomorrow with a guest post/blog swap with
Night Owl Crafting.
are you a crafter?
Do you want to join me?
Let me know and we can work something out.
see you then!

Friday, May 28, 2010

The Scrunchy shirt tutorial

Yeah its finally here!! I really hope I have finally found a way to describe this process in a way you will understand. It is not an exact process, you might want to play with some scraps first, But it is such a fun,fast way to bring LIFE to a shirt.

FIRST you need to start with a shirt that is a little too big. A tight fitted shirt will not work, the scrunching will bring it down about 1/2 a size, depending on how much you do.
Also when choosing the area you want to scrunch, TRY on the shirt, use your hands to wad up the area you want to scrunch. Does it make the neck pull wierd? Does it fit too small or look gross? It will make the bottom of the shirt pull shorter in that area, but that is part of the funky look you get from scrunching.


now after you take it off, outline with a fabric marker or chalk the area you want to work in.
If you have never bought elastic thread this is what it looks like, you will find it in the elastic section. Hand wind your bobbin not tight just pulling a little. Then you will use it just like you would a regular bobbin. Use matching thread on top. Then start sewing.


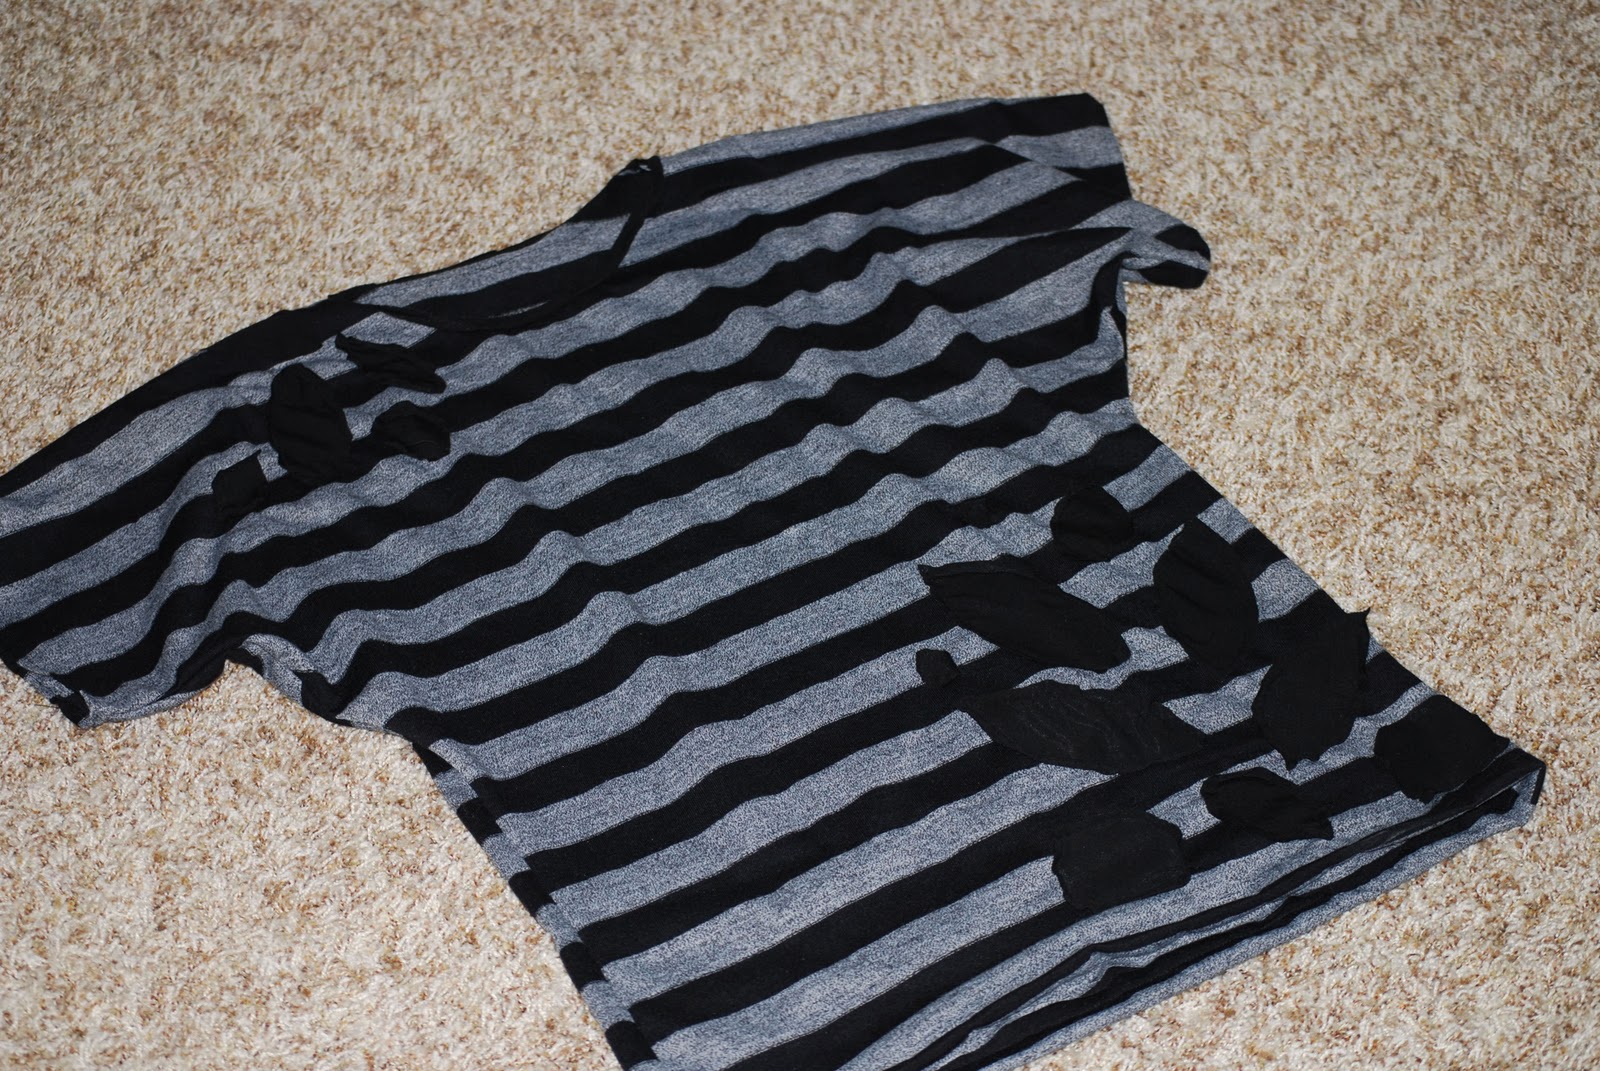
Here is an example of a pattern I chose. THERE IS NO EXACT PATTERN OR PROCESS TO THIS. Just sew in zig zags or figure 8's until you fill the area. This is the way I ended up doing it because there was less turning, lifting foot, and backing up. It was super easy. Believe me, cause I don't do hard stuff. --The only thing to watch for, is trying to keep the circle areas around the same size, that is where the fabric will pop out.
This tank was SO baggy I decided to do a middle section, I really like it on my bathroom floor, not sure how I like it on me. I added little ribbon flowers to disguise how some of the areas are a little off centered.

ANY QUESTIONS??

Wednesday, May 26, 2010

jcrew re-make "the sunray tee"

Hurry, today is the last day for my most awesome GIVEAWAY yet. So get signed up NOW!! For a chance to win a $30 gift card to spend at Karens Cookies.


Here is my cheep version.

the tee was $5 at Downeast, I got one for me, another for my daughter, and another XXL to cut up. when cutting it up always get the biggest size you can, the more fabric the better.


Here is a picture of my friend Katie, wearing the scrunchy shirt that she is still trying to steal from me. We are going to scrunch everything we can get our hands on this weekend. My tutorial was a total bust, I am starting over. sorry.

Friday, May 14, 2010

J Crew look alike

I have been surfing the net for cute ideas for shirts. here is one that cost me $1.49.


J Crews version

the one I made for McKinley, after seeing this gal do it on "I am momma hear me roar".
A blog I totally love and you should too if you like to create for your little boys.

This was a long sleeved tee so I used cute up the sleeves for extra fabric.


Related Posts Plugin for WordPress, Blogger...