Next I took the whole thing apart, use a flat screw driver to pry those wierd "cheap" staples out, Carefully. You won't need the glass for this project
Labels
Friday, October 7, 2011
Fabulous Friday - Kitchen Art
Next I took the whole thing apart, use a flat screw driver to pry those wierd "cheap" staples out, Carefully. You won't need the glass for this project
Monday, May 10, 2010
Messy Ruffle Collar Dress Shirt tutorial
Monday, March 8, 2010
Meet My new crafty friend.... Anne!
So without further ado. Meet my new craft blog buddy ANNE
..............................................................................................
Hi to all the readers at Becky's Craft Closet!!!
I am so excited that Becky wanted to blog swap with me today! My name is Anne and I blog over at FloralShowers.com I am pretty much a craft fanatic...I especially love to crochet and sew (although, I don't like sewing anything too complex---sleeves, zippers, that kind of thing is not exactly my forte. :-) I am the mother of 2 cute kids, and the wife of a super hard working and handsome guy. And I think I am addicted to blogging. I'm trying to cut back----but we'll see how that goes.
So today I thought I would share a simple tutorial on how to make felt flower hair clips. (I have been on a bit of a flower kick lately so that's what you get! he he.)
So here is what you will need:
* Felt circles cut into various sizes and shapes (and of course you will want lots of colors)
* Buttons
* Alligator Hair Clips
* Ribbon
* Needle & Thread
* Hot glue gun (not pictured. ha ha.)
1. After you cut out your felt circles, hand sew them together to form a cute little flower:
Then cut out and sew up a few more :-)
2. Then hot glue coordinating ribbon onto your alligator clip: (The flat side is the side that will go against your head...and if you are making this for someone with fine hair, you may want to leave this side "ribbon free" as it will help the clip not fall out.)
3. Now all you have to do is glue your cute ribbon covered alligator clip onto the back of your cute flowers
and then Voila! You are done! How easy what that!?!
Here are a few other tutorials I have on my blog that you may be interested in checking out! Make sure you say hi, and let me know you came from Becky's Closet!
How to Make a Ribbon Flower

How to Make a Baby Shower Wreath (Also, check out the baby wreath that Becky made using my tutorial!)
Thanks again Becky for letting me post on your awesome blog!!!
Sunday, March 7, 2010
Washer Necklaces tutorial

The metal stamp kit was only 5.95 at Harbor Freight and washers are about a quarterish?? but buy way more than you need. You will have many mistakes trying to get it just right. But the first step is the most important.
1. Take some Ibuprofen for the headache you are about to get from all the pounding!!


4. To hang it I wrapped the washer in wire, and attached a jumpring to the wire, and the ring to the necklace. Then I hung a bead from the wire using a head pin. I got many compliments on it.

Tuesday, February 2, 2010
Applique and Stencil Tuorial

Bond. Then ironed it to the back of the orange shirt, cut it out on each line.

A New outfit

McKinley has loved this shirt since we got it at Universal Studios. We also call it the day I met Kris Allen. :)

Tuesday, January 26, 2010
Skirt from a polo.


Saturday, January 23, 2010
sweater re-do


Wednesday, October 21, 2009
Beaded Watch band Tutorial
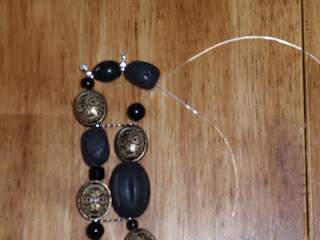
Step one: Cut about 14 inches of stretchy bead/Jewelry cord.
After you have designed how you want your beads to be you will start with an end bead, slide it all the way to the middle, and put a lobster clasp on each side of the bead.
Step Six: The knot will be on the side now, and will be hard to notice. Put a drop of superglue on the knot. Also if your knot is right next to the clasp the superglue might seep into the clasp and ruin it.
Monday, June 1, 2009
How to cut Vinyl with your Cricut
You will need vinyl of your choice (top) and transfer tape (shown below my vinyl so you know what it looks like). This can be done without the transfer tape, but will look so much better if you do use it, its fairly inexpensive. It costs the same as the pckg of vinyl and contains much more than you will need.
If you have the 6 inch cricut like mine you will need to cut the vinyl down to 6x12 to fit in your machine. You can still cut letters up to about 4 1/2 or 5 inches. Use your favorite font and cut them out just as if you were doing this with paper. Thats right. Its pretty simple, the next part is the really important step.
Next you will need to prepare a piece of transfer tape. Do this by cutting a little section off just guessing how much you will need. Peel off the sticky top part, and carefully lay it somewhere safe, so you can use it in a minute.
once you have all the letters on, you place the sticky paper back over top. rub really hard with your tongue depressor. Next if you need to you would cut the words apart. Since mine is a chore chart, that is what I did.
Friday, December 19, 2008
Tea towel Apron tutorial

then measure it into thirds, make two triangular tucks on each of the 1/3 marks.

Cut your coordinating fabric into approx 6 inch, strips, sew 2 of the strips end to end. It will be about 90 inches long (plenty long enough to wrap around your waist, I like to tie it in front). Iron it like I have in the picture.

find the middle of the strip of fabric and pin the apron in it, then fold the fabric over and sew the strip closed.


TADA!!! If you have more of the strip of fabric you could sew a pocket or another strip onto the bottom using the same process above. I am too lazy.