Labels
aprons
(4)
baby
(6)
bags
(2)
bibs
(3)
Birthdays
(4)
blankets
(3)
blogswap
(1)
cakes
(7)
Christmas
(4)
cleaning
(1)
clothing
(38)
decorating
(14)
Easter
(1)
Etsy
(4)
favorite blogs
(2)
for sale
(21)
funny
(2)
furniture
(3)
gifts
(8)
giveaways
(6)
guestposts
(1)
jewelry
(15)
kids
(9)
organizing
(7)
Other Holidays
(1)
pre-school
(2)
recipe
(9)
scrapbook/cards
(3)
sewing
(34)
signs
(4)
thrifty finds
(11)
tutorial
(12)
vinyl
(3)
watch bands
(2)
Wednesday, October 21, 2009
Beaded Watch band Tutorial

Before starting you need to decide on the length, If you have a watchband measure it. If not measure a bracelet that fits nicely and subtract the length of the watchband.
Step one: Cut about 14 inches of stretchy bead/Jewelry cord.
After you have designed how you want your beads to be you will start with an end bead, slide it all the way to the middle, and put a lobster clasp on each side of the bead.
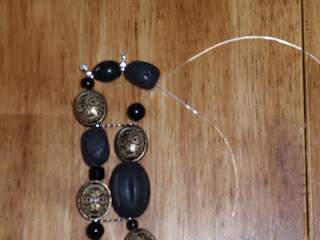
 Step two: start beading - by putting a bead on each side, you want the beads to equal the same length when it is time to add the spacer bar. you will add one when you get 1/3 the bracelet done and again at the 2/3 length.
 Step three: I add a few extra small beads to each kit so you can make them longer or add them to make the sides match up. Below I added a small bead on the left to make it match the right side.
 Step Four: Here is the second space bar at 2/3 the way through the band.
 Step Five: I add the final beads putting most of them on one side, lobster clasps and all.
 below will help make sense of why I do this.
Step Six: The knot will be on the side now, and will be hard to notice. Put a drop of superglue on the knot. Also if your knot is right next to the clasp the superglue might seep into the clasp and ruin it.
 I hope I explained it clearly, If you have any questions please just ask in my comments.
Step one: Cut about 14 inches of stretchy bead/Jewelry cord.
After you have designed how you want your beads to be you will start with an end bead, slide it all the way to the middle, and put a lobster clasp on each side of the bead.
 Step two: start beading - by putting a bead on each side, you want the beads to equal the same length when it is time to add the spacer bar. you will add one when you get 1/3 the bracelet done and again at the 2/3 length.
 Step three: I add a few extra small beads to each kit so you can make them longer or add them to make the sides match up. Below I added a small bead on the left to make it match the right side.
 Step Four: Here is the second space bar at 2/3 the way through the band.
 Step Five: I add the final beads putting most of them on one side, lobster clasps and all.
 below will help make sense of why I do this.
Step Six: The knot will be on the side now, and will be hard to notice. Put a drop of superglue on the knot. Also if your knot is right next to the clasp the superglue might seep into the clasp and ruin it.
 I hope I explained it clearly, If you have any questions please just ask in my comments.
I also have plenty of watchbands, and Watchband kits in my Etsy shop.
Subscribe to:
Comments (Atom)


